Wednesday, June 30, 2010

Magistical Memories Chipboard creations

This is my last month working for Magistical Memories, so I created along with my Dad card, a layout and a second card. I adore the layout.
I created this with gcd studios papers, adding them to my cream background. I embossed my star chipboard from Magistical Memories and added paper behind it. I also dotted the edges, making it look stitched.
I added Bobunny rubons to white paper, and used those behind my title letter stickers which is a mix of MM and Bobunny and Reminisce letters. I added my rolled flowers, spraying them with glitter as well.

I also made this card, finished on the inside as well. I used a gcd studios flocked paper, cutting out around the bracket shape. The cardstock is Bobunny. I added a Magistical Memories heart, embossed the chipboard with my dots folder and lightly inked it just on the dots and the outside edge. I added a rolled flower and some wide ribbon, with letters from Colorbok.

Here is the inside, short and sweet.
Thanks for dropping by today!
kris

Tuesday, June 29, 2010

Tuesday cards

Paper Crafts recently had a call which I submitted several cards to, did get one picked up, but these couple were not, so here I am to share them with you.
I was using up some scraps of gcd studios papers, and created this card. I punched the edges of the card with my ek punch, then added in the two scraps of homespun chic paper. I added the frame, putting in one of my fabric homemade rolled flowers, adding several pearls and two bobunny cardstock leaves. I also added a small button and floss bow at the top. I put a little lace at the top of the card ( given to me by my sis Kelly) and added the Reminisce and Amer. Crafts glitter letters.
This card, turned out to be my favorite, I just think it's adorable. I was creating with some Cosmo and came up with what I was going to make into a pleated skirt, but didn't end up using it. What I did think of was a lamp shade. So I paper pieced the bottom of the lamp, added in some bobunny dot cardstock for a table and scallop punched the floral top. I added in more Cosmo stickers for the greeting.
Lastly, I created another gcd studios card. I love these sayings cards that are a part of the Homespun chic line, it's my favorite line I think. I added in lots of layers with the paper, adding in scallop punched cardstock and a Bazzill border, plus one of my flowers, with a clear gem in the center. I also added this green ribbon (bobunny) bow and button. Then I added a bit of lace to the bottom of the brave girl card.

Have a terrific day!
kris

Monday, June 28, 2010

Back from staycation

Good morning to you! wow, it's been a hot one this past week. We were on vacation last week, not really going somewhere for the whole time, we did a couple small day trips.
One fun part of our vacation was to travel down to Luray Caverns in Virginia, and after, drove along a portion of the Skyline Drive in the  Blue Ridge Mountains in Shenandoah National Park.

Here are some pics of our trip.
This is hubby and girls inside the caverns, it gets quite close but at times opens up to huge spaces. At 6ft 6 inches, my dh had to duck quite a bit. What was neat about the caverns is the self guided tours, you walk about 1 1/5 miles along the path and you have headphones to give you info about certain spots. Also it was cool but humid, compared to the 96 degree day outside, it was a great cooler way to enjoy the day. I figured it was about 75 -80 degrees in the cavern.


Here is a pic of Annalise inside one of the stalagmites - just so show you an idea of how huge some of them are. In several spots the rocks stick up through the path ( or down like here), which is a nice photo op spot. Just to tell you how old this stalagmite is- it takes about 300 years to create 1 square inch of rock.


Inside the cavern is still active, growing, and there are spots with water flowing. This is Mirror Lake- not deep but so beautiful, showing the stalagmites on the ceiling.


There is one spot with colored lights- the wishing well, where people are allowed to toss coins in. The Caverns donates the money to charity.


Skyline Drive is quite beautiful. I have vertigo and dislike high places with little protection from the edge ( there are stone walls keeping you on the road), but am impressed with how well I handled this drive.
The day  was hot and humid, making the mountains in the background misty and vague.


Just a pic of some pretty flowers we happened upon along one of the overlooks. btw- don't you love blogging, making you look at the dreaded vacation pics! LOL!!


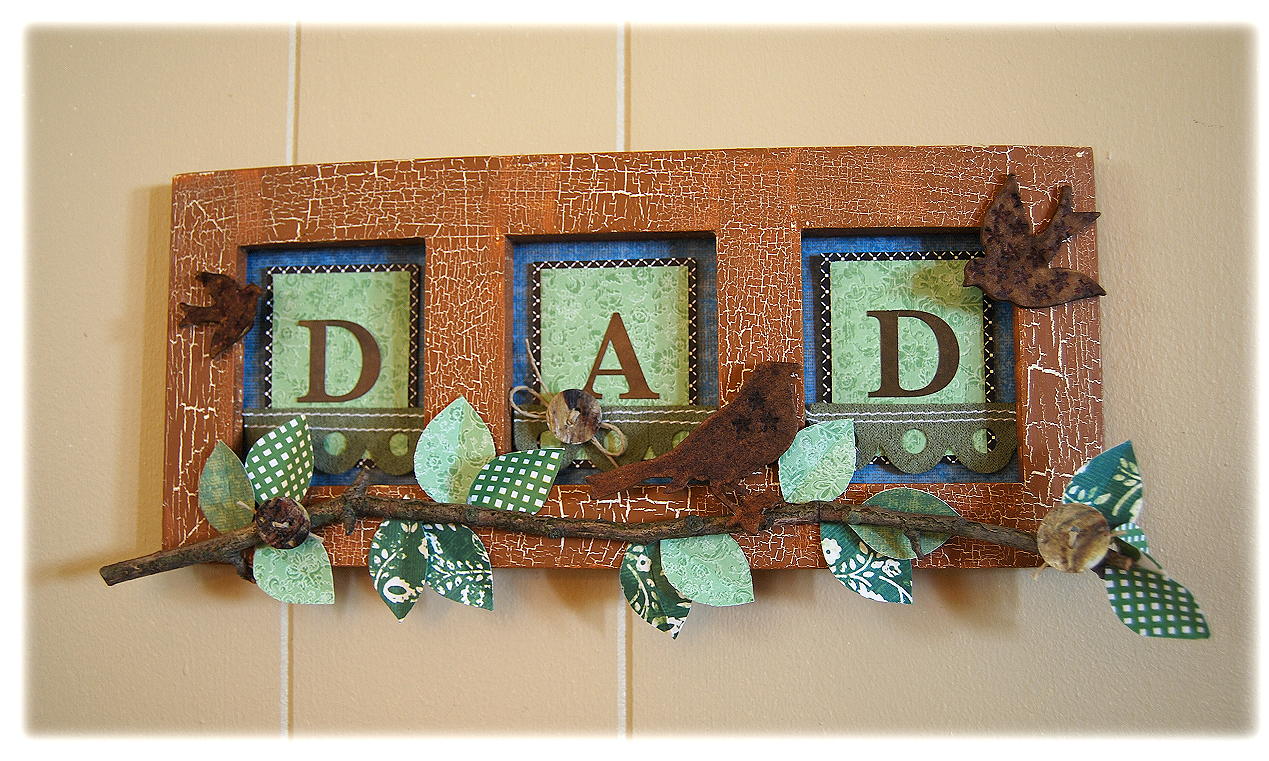
ok- on to scrapping. I made this card for Father's day for my hubby, and sent it to be included in the Cards blog challenge, but didn't share it here. I made it with Cosmo Cricket papers, making my own banner at the top. I also used two Magistical Memories chipboard pieces, one raw ( circle ) and one inked ( star ) . I punched holes in the circle, adding in a twine stitching, and knotting it at the end. I also embossed my star with my swiss dots folder, and added some K&CO letters. the metal brad is from Bobunny.

thanks for stopping by today!
kris

Thursday, June 24, 2010

Repurpose a tin


As you've seen this month, this beautiful piece has been our inspiration. I started out thinking- earth and recycling/re-purposing.  I love the clouds and all the blues. I decided to remake an altered tin I had created for a mini album I never finished. I recycled it into a tin to hold my bobbins for sewing. 


I created the tin with mainly blues, adding in a little yellow and pink with embellishments and paper. I wrapped the tin with different Ava collection papers. Then I added this chipboard oval to the front of the tin. I layered it over a white cardstock cut with deco scissors.
Remember that photo montage at the top- and the beautiful clouds and the sweet cloud necklace-they inspired me to add clouds to my tin. I embossed my blue paper with a swirls embossing folder, then hand cut out and foam taped the clouds in layers.


I added faux stitching on my oval, then added the sewing machine lady to the front of the tin. I added a chipboard word strip, buttons and the word Bobbins to the front.


For the top of he tin, I cut sewing pattern tissue paper in circles, then I added this large button looping my twine to make it into a flower. I also added another word chipboard strip, and a bow to pretty up the handle.
I hope you have enjoyed my post today!

supplies- gcd studios ( ava collection papers, Homespun chic embellishments- chipboard strips, vintage buttons, chipboard sticker,  chipboard oval.) other- sewing pattern paper, black pen, ribbon, some buttons)

kris

Tuesday, June 22, 2010

two cards

Good morning! we are still on vacation, so I wanted to just share a couple cards that I made last week. Echo Park paper was having a facebook contest and I won with these two cards.
This card I used the green gingham as the background, adding a strip of the orange across it and  adding in a strip of white scallops punched with my ek punch. Next I cut out a block of kraft that I had punched a scallop circle with. I foam taped the block and added a pen drawn line. I also added this small flower sticker, popdotting it from the paper too. I added half of the banner sticker, putting small stickers at each end. I made my own 'ticket' and added the words Happy Bday with Oct. Aft. letter stickers.


This second card is similiar, I used kraft behind the green gingham, and drew around the outside with a pen. I added a strip of orange and another of rainbow stripe. I added a little white rickrack at the bottom of that. I also handcut two clouds and pop dotted them on there. I then punched a kraft scallop, penned some lines and added stickers, popdotting them. I added the quote sticker and a couple small gems to the flowers.


Hope you are having a super week!
kris

Saturday, June 19, 2010

Echo Park

Good morning! I will be only showing a few items this coming week, as hubby is on vacation again and we are going to be doing some day trips.
For today, I wanted to share some cards made with a beautiful collection. If you haven't heard of Echo Park paper yet, you need to go see their collections. They are a new company but they have come out with a bang. I fell in love with this Summertime collection and bought some of it. They have a new collection called Walk in the Park as well, they are both terrific! Right up my alley in colors and cute designs.

I created a couple cards yesterday.Using  the Summertime collection, I added a mat around my kraft cardstock, which I sewed a border around. I added a little scallop border strip down at the bottom.
Then I popdotted the pinwheel stickers, adding small buttons to their centers. I also popdotted the quote sticker, and added a bit of ribbon with a brad. I added the summer letter stickers by doodlebug.


Next I made this card, using the stripe paper, and the reverse orange at the bottom of the card. I added the green gingham paper punched with my ek punch, and them added in this kraft strip foam taped across the middle of the card. I added the flower sticker border to the kraft paper, adding in the bobunny button, and I also added in a few matching gems to the middle of the flowers. I handcut a sun ( used my deckle scissors for the sun beamy part) and some textured paper for the clouds. Isn't this a bright and cheery card!


Now, seriously this next card is totally scraps! Thin and small bits left from cutting papers to make the other cards, I didn't want to throw away a bit! I layered the strips, and sewed across the strips with my machine. I also made this fun pinwheel, cutting in and folding the pinwheel from the corners. I added a sticker to the middle of the pinwheel. I used a large toothpick for the stick part of it, and tied on a bit of bobunny ribbon. I punched a circle with my other ek punch and added the doodlebug letters and heart sticker.


I hope you have enjoyed my designs today! have a terrific weekend!
kris

Friday, June 18, 2010

Good morning!

I have a couple more sticker cards to share with you today. Yesterday I shared several cards I made with a Pebbles sticker sheet, today I will share the rest of the cards with you. When I buy stickers, I really try to use up everything on the sheet. I bought these stickers on clearance and just thought they'd make adorable cards.
This card I made as a cute baby card, perhaps if you aren't sure what the gender of the baby will be.

To go over the supplies once again- I used WRMK papers, and a corrugated blue paper that I punched with my ek punch. I used the button stickers, then added Bobunny buttons to the tops of them. The letter stickers are Doodlebug, as is the little heart sticker.


Next, is an inside and out card. I just thought this robot was too darling, and came up with the "Aww nuts.. I missed your birthday" sentiment, again, thinking it was so adorable. More of that corrugated blue paper, a little scrap orange cardstock and some blue Bobunny dot cardstock. I added in October Afternoon stickers, and a Bobunny button.


here is the inside- I kept it pretty simple.


Lastly- with all my Pebbles stickers used up, I used a few tiny scraps of gcd studios paper. I also used a little bobunny pink dot cs. I also threw in a few scraps of Bazzill borders, and one of my rolled fabric flowers. I hand cut my leaves, added in a shell button with twine, and greeting is Doodlebug letters.


Have a terrific weekend!
kris

Thursday, June 17, 2010

Some sticker cards

Hi there! I have been busy with end of year stuff with my girls, today was their last day. I recently made a purchase of some clearance goodies at ACherryOnTop, and couldn't wait to play with them. These stickers are from a Pebbles sticker sheet, I assume they were for baby boys, something I rarely scrap or create for, but I had fun with these.
First up, I used some corrugated paper for the scallop border - punched with my ek punch. The paper is old old stash and I've been getting out some of my older textured papers to play with. The patterned papers are WRMK, and a little brown dot bobunny cardstock. Some mixed buttons, and this adorable giraffe stickers- remember- from the Pebbles sheet, a little twine and a few Colorbok letter stickers complete the card. I rounded the corners on the blocks of paper, just to make it a little different.


Next,I have this totally stickeriffic card. I used more of the blue corrugated, adding in a bit of twine and matchy matchy buttons. I foam taped the stickers and kind of layered them on. The green background paper is more of that WRMK paper reversed. I really liked this one. I esp. like dressing up stickers with buttons and stuff- they seem so much cuter with a little dimension.


Last one today. Again, same papers- WRMK and the corrugated blue, with a scrap of Bobunny chocolate dot. Same stickers- Pebbles. I added a tag top in kraft, adding in a bobunny brad. I also added in some October Afternoon sticker letters, punched the bottom of the card with my ek punch and added a BB button and twine to the turtles back.


Be back tomorrow with a few more cards.
Have a terrific day!
kris

Tuesday, June 15, 2010

Tuesday Trigger


Today on the Moxie Fab blog, Cath gave us this funky pillowfor our Tuesday Trigger. Look at all those stripes! I was sitting here with some Cosmo Cricket sitting on my desk and thought, Cosmo has several striped papers- what if I used them like the pillow stripes? Plus I liked the shape of the pillow, so I cut my card to kinda match the shape as well.

I used Material girl, Early Bird and Joy Ride paper stripes, then added in punched squares for my twine banner. the letters are Amer. Crafts fabric letters ( * heart these!!* ) and I punched a couple stars and added a button to the one star.


thanks for dropping by!
kris

Technique Tuesday

Good morning! today my post is up on the Pink Paislee blog, and I thought I'd share the project here with you as well. Please go check it out there if you can, and see the gallery where so many talented ladies share their Pink Paislee Projects.

For this project, I am showing how you can use cardboard as a sturdy base, and make your own beautiful wall hangings like this one....


more instructions are included on the Pink Paislee blog. click here to jump to it.

Supplies used are Pink Paislee Queen Bee and Bayberry Cottage papers, Queen Bee Flip Notes, Expressions Glittered Alphabet in Licorice, Expressions Weathered Wood Alphabet in Cotton, Starlight Alphabet letters, and Artisans Tapes in green, sage and licorice.


Hope you like my project today!
kris

Saturday, June 12, 2010

quick card post

Good morning.  I just have a couple quick cards for you to see today. This afternoon we are going to see a Monster Truck show at Lincoln Financial Field in Philly. It's my hubby's fathers day gift, which he is very happy to get. 

But for today here are two aqua cards.
First is this dream\live card
I used scraps of gcd studios scraps of homespun chic and ava collections. I added in half a doily, a handmade red fabric flower and two handcut leaves. The quote is a Reminisce card and I added a small piece of Bazzill border with gems to the bottom. The edge of the card is punched with my EK punch.


Next is this card, made for my niece's birthday.Aqua is one of her favorite colors, so I hope she likes it.
The background is old KI memories paper, I added in a computer printed greeting, cut with my scallop scissors. I added a Reminisce sticker tag, and bobunny glitter brad. The puffy butterfly is Stickopotamus. and it has more of that Ava collection paper, embossed ( swiss dots folder) white cardstock, and the Bazzill scallop strip with more gems.


That is all I have to share today, have a terrific weekend and thanks for dropping over!
kris

Thursday, June 10, 2010

Bringing the Outside In

Hello! I have a fabulous post for you today. I have to tell you, I struggle with Father's Day. Masculine style is hard for me to create. I do love my glitter, gems and lots and lots of pink. But I try to include Hubby in my creations, which is why, today, I am bringing the outside in.

Have you ever seen something from nature and wanted to use it for a decor item? Sometimes I add rocks, or leaves, or even sticks to my art. If you wash them ( if you can) or pick a nice green stem that is still supple, they work beautifully. 

Think of all the natural items in the craft store you can buy: skeletonized leaves, sea shells, pebbles, dried flowers, etc..  Now think of the savings if you simply look in your back yard.

For this frame, I picked a nice twig that had fallen to the ground.


Supplies-( gcd studios artsy urban papers ( from 8x8 pad), artsy urban felt diecut borders, chip art tool set (mini shapes) chipboard birds ) other- letter stickers Reminisce, markers- sharpie, buttons and twine, paint, crackle medium, frame

First- Paint your frame cream, then crackle coat it, and repaint again with burnt sienna acrylic color. Allow to dry.
Remove glass from frame.
Cut pieces of blue paper to fit inside each frame. Then cut green paper into rectangle and mat with black paper.Add sticker letters to each rectangle. Foam tape back of rectangles and adhere to blue paper inside each frame.


Cut scallop border into pieces to fit the width of each frame. Adhere across green paper. Use ChipArt tool to deboss small star into several bird shapes, color with burnt sienna marker.


Take twig and see what position best fits across frame, if needed sand down spots where twig meets frame to better hold glue.Glue into place and allow to dry. Hand cut leaves of different papers, adhere to twig and frame in an artful way. :)
Tie bow with single button and knots in several more. Add to branch and letter A frame as shown.


Won't this make a great Father's Day gift for any dad! I sure hope I can keep my kids quite about it long enough to surprise my hubby!!
Have a great day!
kris

Wednesday, June 9, 2010

Moxie Fab trigger

hello, just a quick post for the Moxie Fab blog's Tuesday Trigger. Cath gave us this sweet popsicle image to work with.


I was charmed by the top popsicle, with the pink/orange/purple combo, so I based my card on that.


I used some Bobunny stamps, and stamped in the colors, stamping again with the extra ink into the next color. I then stamped each flower image, and punched them out with my ek scallop circle punch. While I was stamping, I stamped a second flower, then punched out only the middle with this ek flower punch and popdotted them in the centers of the flowers. I then used a gem in each flower coordinating with the colors.
The letters are cream letters I colored with Bic Markers.
thanks for looking!
kris

Cosmo layout

Good Morning! I have been busy with things I can't share just yet, but I do have a little layout to share with you.


I made this layout for the Cosmo Cricket/Glue Arts partnership this month. If you head over to the Glue Arts Blog you can click on the enter now button and see all the fun going on.
For my layout, I used a lot of Joy Ride collection and a little Early Bird collection. I also used a bit of the front sheet of the kit, see that block strip?  I simply cut down the piece and added it to my layout. I am talking about the 'cover sheet' on these kits, they have designs showing you what is included in the kit.  I feel like I get a little extra since I wonder how many people actually think to use them.
 ( and since they are shrunk down pieces, some are just perfect for cards and tags.
details on my layout- I used a circle punch to make my banners. I cut out around the road trip tag and popped it up. Everything here except for ; twine, textured paper, font and ink is Cosmo Cricket, and I used Glue Arts adhesives and foam tape for adhesive on the layout.
 ( sorry for the wonky look to my right side- with the foam tape my scanner adjusted weirdly)
have a super day!
kris

Sunday, June 6, 2010

Cosmo Cricket love

Hello! I have been just loving my new (to me) Cosmo Cricket Material girl line, so I created a couple quick cards with it.


 First, I have this fun For you card, I cut out the sewing form from the paper, adding foam tape to the back. I also added one of my fabric flowers, adding some fabric leaves as well.  I cut both the greeting and the journal block from paper as well. I also added in a gem to the flower and a button flower to the sewing form.


This card uses some of the same papers, love that yellow'/red flower paper. I cut out a few flowers adding in this sew sweet sticker on foam tape. I added buttons to my flower centers, and gems to the sticker. I also added some scallop punched bobunny dot paper, a pretty ribbon and these great Cosmo chipboard letters as well.
Gonna be another hot one today- enjoy your weekend!
kris

Thursday, June 3, 2010

Cute teacher gift

Good morning! I thought I would share this sweet teacher gift tin with you today. This is a special gift of course, meant for a very special teacher. To share with you, I have simply filled it with mints, but it would be wonderful with chocolates, or candy favorites, cookies. etc...
This project is made with Cosmo Cricket papers ( Material Girl) and chipboard letters.


I used an old Maya Road tin, which had chipboard flowers in it. I first covered the top edge, since there was the name and a small phrase on it. I just used some matching red cardstock I had. I mitered the corners, then cut off the sharp edge with my corner rounder ( a pair of cloud shape fiskars deco scissors).
Then I added a strip of the measuring tape paper.


For the flowers, I cut a strip of fabric- about 12 x 1 inch or 12 x 1 1/2 inches. Nothing exact here. I added liquid glue to a scrap of cardstock, and added a knot to the very end of the fabric strip. From there, I twisted the fabric to make a rope, then just wound it on itself in a circle shape, making sure there was enough glue underneath to hold the fabric in place. I really love the bits of thread poking out, they seem so homey that way. They can be finished off any way, but this time I added some different matching gems to the centers.


 For the middle part, I used a border with this nice saying on it, then punched out my side scallops with my ek punch. I wrapped it around the lid, gluing well with my Glue Arts perma dots runner, and trimmed off the excess, this way the lid can be easily opened.
I added  a twill ribbon bow, with button. and I added some chipboard letters for the word. I took a small strip from the bottom of the paper- and curled the edges, adding that to the front as well.


I hope you have enjoyed this cute project. Thanks for dropping in today.
kris

Wednesday, June 2, 2010

Getting through the week

Happy Humpday to you- I am loving this short week- feeling like I am getting things done.

No cards today- I wanted to share this cute altered item. I took a check book cover and altered it. I thought this would make a terrific gift ( or personalized item for you) 


For this- I used Cosmo Cricket's Material girl line. I loved the Puny sentiment of "material" paired with a checkbook. ( wouldn't this be terrific if you are also really into quilting or fabric crafts?)  


Now that flower is just a 12 x 1 1/2 inch strip of fabric wound into a flower- I will revisit this later this week.
I sewed the veins in the leaves with black thread. I also wound floss around the spools. I cut out the girl, the spools and the bracket journal spot from the border strips and block papers. Even the I'm a material girl was a border cut down.


Inside is my register and checks. Isn't this cute!?!
thanks for stopping by today!
kris